Bi-Directional Packet Capture on ESXi

I recently ran into an issue where we needed to capture some packets from the vmk interface on a Nutanix/vSphere host. I found this great utility for that, pktcap-uw, however it only captures traffic in one direction by default. Thankfully I found someone with the info on how to run both incoming and outgoing captures at the same time.

  1. SSH to the host
  2. Update the cmd below to reflect your vmk port or whatever you are trying to capture
  3. Run this cmd
  4. pktcap-uw --vmk vmk0 --dir 0 -o /tmp/vmk0_in.pcap & pktcap-uw --vmk vmk0 --dir 1 -o /tmp/vmk0_out.pcap &
  5. Shut down the capture after your done with this cmd
  6. kill $(lsof |grep pktcap-uw |awk '{print $1}'| sort -u)
  7. Use WinSCP to connect to the host
  8. Copy vmk0_in.pcap & vmk0_out.pcap files from /tmp/*
  9. Save them somewhere useful
  10. Open in wireshark
  11. Click File > Merge > pick the 2nd file
  12. And you should be presented with a capture with both incoming and outgoing packets.

Using the pktcap-uw tool in ESXi 5.5 and later (2051814)

@beandrew – his reply is what got this working for me

Securing VMs

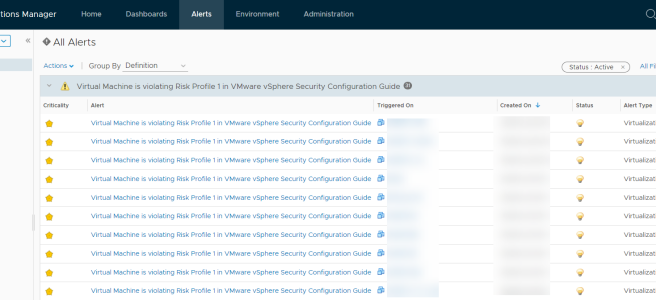
So you enabled the vSphere Compliance module in vRealize Operations Manager and now your VMs are all reporting the following alert.

“Virtual Machine is violating Risk Profile 1 in VMware vSphere Security Configuration Guide”

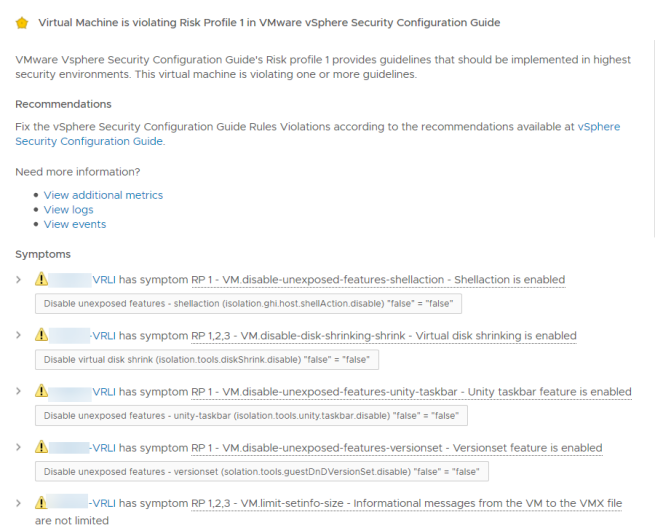
Viewing the details shows symptoms similar to the following:

0017

I’m not going to cover the details on what each setting does but for the most part these are safe to run, however if your are concerned about what it might do you should test it for yourself.

Note: This will not remove the floppy drive since the VM needs to be powered down and I didn’t need to disable that for many of the VMs when I built this.

#Selecting the target VMs
$vms = Get-VM
#Looping through each VM and setting the value, to rollback change TRUE to FALSE and re-run the script
foreach ($vm in $vms) {
New-AdvancedSetting -Entity $vm -Name isolation.bios.bbs.disable -Value TRUE -Confirm:$false -Force:$true
New-AdvancedSetting -Entity $vm -Name isolation.device.connectable.disable -Value TRUE -Confirm:$false -Force:$true
New-AdvancedSetting -Entity $vm -Name isolation.device.edit.disable -Value TRUE -Confirm:$false -Force:$true
New-AdvancedSetting -Entity $vm -Name isolation.ghi.host.shellAction.disable -Value TRUE -Confirm:$false -Force:$true
New-AdvancedSetting -Entity $vm -Name isolation.tools.autoInstall.disable -Value TRUE -Confirm:$false -Force:$true
New-AdvancedSetting -Entity $vm -Name isolation.tools.diskShrink.disable -Value TRUE -Confirm:$false -Force:$true
New-AdvancedSetting -Entity $vm -Name isolation.tools.diskWiper.disable -Value TRUE -Confirm:$false -Force:$true
New-AdvancedSetting -Entity $vm -Name isolation.tools.dispTopoRequest.disable -Value TRUE -Confirm:$false -Force:$true
New-AdvancedSetting -Entity $vm -Name isolation.tools.getCreds.disable -Value TRUE -Confirm:$false -Force:$true
New-AdvancedSetting -Entity $vm -Name isolation.tools.ghi.autologon.disable -Value TRUE -Confirm:$false -Force:$true
New-AdvancedSetting -Entity $vm -Name isolation.tools.ghi.launchmenu.change -Value TRUE -Confirm:$false -Force:$true
New-AdvancedSetting -Entity $vm -Name isolation.tools.ghi.protocolhandler.info.disable -Value TRUE -Confirm:$false -Force:$true
New-AdvancedSetting -Entity $vm -Name isolation.tools.ghi.trayicon.disable -Value TRUE -Confirm:$false -Force:$true
New-AdvancedSetting -Entity $vm -Name isolation.tools.guestDnDVersionSet.disable -Value TRUE -Confirm:$false -Force:$true
New-AdvancedSetting -Entity $vm -Name isolation.tools.hgfsServerSet.disable -Value TRUE -Confirm:$false -Force:$true
New-AdvancedSetting -Entity $vm -Name isolation.tools.memSchedFakeSampleStats.disable -Value TRUE -Confirm:$false -Force:$true
New-AdvancedSetting -Entity $vm -Name isolation.tools.trashFolderState.disable -Value TRUE -Confirm:$false -Force:$true
New-AdvancedSetting -Entity $vm -Name isolation.tools.unity.disable -Value TRUE -Confirm:$false -Force:$true
New-AdvancedSetting -Entity $vm -Name isolation.tools.unity.push.update.disable -Value TRUE -Confirm:$false -Force:$true
New-AdvancedSetting -Entity $vm -Name isolation.tools.unity.taskbar.disable -Value TRUE -Confirm:$false -Force:$true
New-AdvancedSetting -Entity $vm -Name isolation.tools.unity.windowContents.disable -Value TRUE -Confirm:$false -Force:$true
New-AdvancedSetting -Entity $vm -Name isolation.tools.unityActive.disable -Value TRUE -Confirm:$false -Force:$true
New-AdvancedSetting -Entity $vm -Name isolation.tools.unityInterlockOperation.disable -Value TRUE -Confirm:$false -Force:$true
New-AdvancedSetting -Entity $vm -Name isolation.tools.vixMessage.disable -Value TRUE -Confirm:$false -Force:$true
New-AdvancedSetting -Entity $vm -Name isolation.tools.vmxDnDVersionGet.disable -Value TRUE -Confirm:$false -Force:$true
New-AdvancedSetting -Entity $vm -Name isolation.monitor.control.disable -Value TRUE -Confirm:$false -Force:$true
New-AdvancedSetting -Entity $vm -Name tools.setInfo.sizeLimit -Value "1048576" -Confirm:$false -Force:$true
New-AdvancedSetting -Entity $vm -Name vmci0.unrestricted -Value FALSE -Confirm:$false -Force:$true
Get-CDDrive -VM $vm |Set-CDDrive -StartConnected:$false -NoMedia -Connected:$false -Confirm:$false
}


Fix: User running the upgrade does not have ‘Replace a process level token’ privilege.

While migrating Windows vCenter Server 5.5 to VCSA 6.5u2c this error was observed and corrected using the following steps.

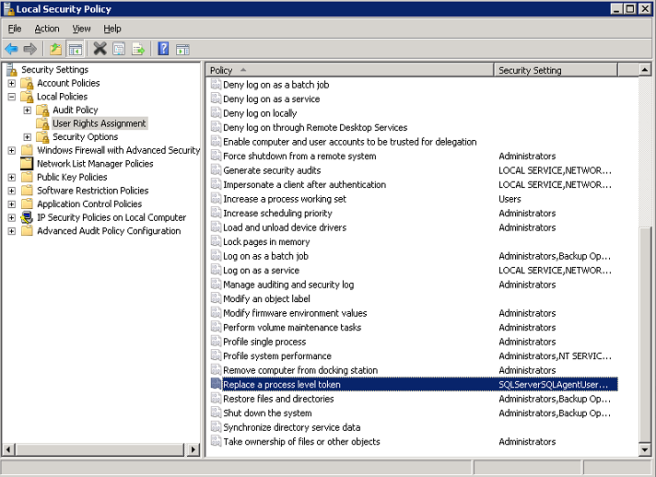
  1. Open Administrative Tools > Local Security Policy
  2. Navigate in the tree to Local Polices > User Rights Assignment0014
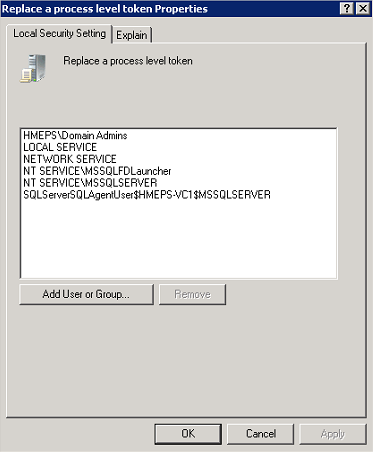
  3. Open the ‘Replace a process level token’ policy
  4. Add the migration user, in this case I added ‘Domain Admins’0015
  5. Click OK, there is no need to restart the server before re-attempting the migration

Related KB: https://kb.vmware.com/s/article/2148010

Compliance Alert on Uplink dvPortGroups

Just a quick note on a recent discovery.

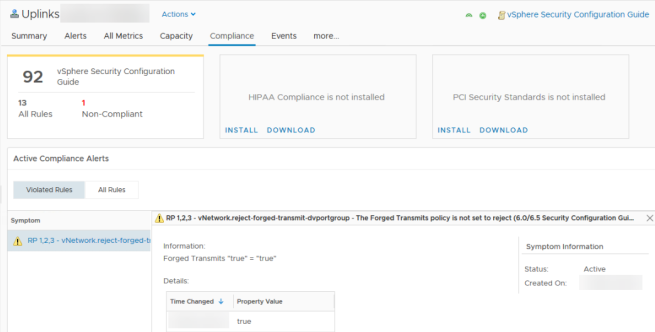
When using the vSphere Security Configuration policy in vRealize Operations Manager you may see an alert similar to the following.

RP 1,2,3 – vNetwork.reject-forged-transmit-dvportgroup – The Forged Transmits policy is not set to reject

vrops-security-alert

Checked the config for the security policy on the port groups using:

Get-VDPortgroup | Get-VDSecurityPolicy

After some digging I found that Forged Transmits is enabled on uplink port groups by default but not on regular port groups. This is because the uplink ports will need to pass traffic (VM, management, etc…) for MACs that are not on the interface.

This alert is a false positive and should be excluded from the compliance checker. Time permitting I will follow up with info on how to do this.

tl;dr – don’t disable forged transmits on uplink port groups, something will break

Here is some good background info on forged transmits: http://wahlnetwork.com/2013/04/29/how-the-vmware-forged-transmits-security-policy-works/

Someone else with the same issue: https://communities.vmware.com/thread/577449


Reset ESXi root account w/ PowerCLI

This method of resetting the root password does not require you to know the existing password and is a lot easier that setting up a host profile to change the passwords.

Original script source & writer – the best script is one someone else already wrote 🙂

# https://www.linkedin.com/pulse/reset-esxi-root-password-through-vcenter-esxcli-method-buschhaus
# First, setup $vmhosts. You can do this many ways.$vmhosts = Get-Cluster -Name ClusterWithUnknownPassword | Get-VMHost
# Just so it contains one or more VMHost objects.
# To reset all ESXi host passwords use
# $vmhosts = Get-VMHost
# $vmhosts = Get-Cluster -Name "Cluster Name" | Get-VMHost

# Since this only works on ESXi 6 and up I used this option to skip the 5.5 hosts that will error out. -AD
$vmhosts = get-vmhost |Where-Object {$_.Version -eq '6.0.0'}

# This will prompt for the new root password -AD
$NewCredential = Get-Credential -UserName "root" -Message "Enter an existing ESXi username (not vCenter), and what you want their password to be reset to."
Foreach ($vmhost in $vmhosts) {
    $esxcli = get-esxcli -vmhost $vmhost -v2 #Gain access to ESXCLI on the host.
    $esxcliargs = $esxcli.system.account.set.CreateArgs() #Get Parameter list (Arguments)
    $esxcliargs.id = $NewCredential.UserName #Specify the user to reset
    $esxcliargs.password = $NewCredential.GetNetworkCredential().Password #Specify the new password
    $esxcliargs.passwordconfirmation = $NewCredential.GetNetworkCredential().Password
    Write-Host ("Resetting password for: " + $vmhost) #Debug line so admin can see what's happening.
    $esxcli.system.account.set.Invoke($esxcliargs) #Run command, if returns "true" it was successful.
}

VCSA Upgrade: Failed to authenticate with the guest operating system using the supplied credentials.

Problem: During an upgrade from VCSA 6.5 to 6.7, the following error was observed in the install log and prevented stage one of the upgrade from starting.

  • error: sourcePrecheck: error in getting source Info: ServerFaultCode: Failed to authenticate with the guest operating system using the supplied credentials.

The root password entered into the wizard worked for logging into the appliance via the web interface (https://vcsa-ip:5480/) as well as via SSH.

Attempting to change the password or disable password expiration via the web interface did not work.

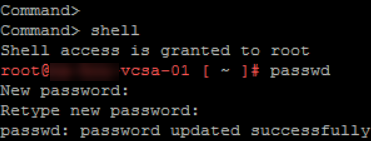
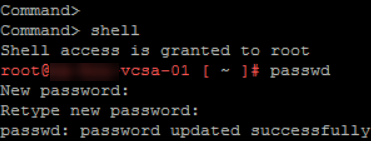
Solution: I was able to reset the password via SSH using the follow commands. Once done the wizard accepted the password and was able to complete stage 1 of the upgrade.

screencap1

Success!

screencap2

Rough start… Pt2

Since I managed to mess up the permissions on the first attempt at this new site here goes part two. Also, managed hosting is so much easier 🙂

I’m not sure where to start but my goal for this blog is to share what I’ve learned, and what I’m learning now. Topics are likely to include troubleshooting & installs related to projects I’ve worked on; certifications and learning new tech; and thoughts on consulting, business, and leadership. Many will link to other sources, most will be short, and my goal for all of them is to offer a unique perspective and hopefully add some value to the IT community.