Switch vDS PGs to LAG uplink

Recently I needed to configure LACP on a distributed switch that was already setup. With about 20 PortGroups (VLANs) already configured, the idea of clicking through each one to update the uplinks to the LAG from the standard uplinks sounded really boring.

I found this post by Ben Liebowitz on automating the creation of new port groups and stole the peices that I needed to just update the PortGroup active uplinks. So here it is.

Get-VDSwitch vDS-SwitchName |Get-VDPortgroup |Get-VDUplinkTeamingPolicy |Set-VDUplinkTeamingPolicy -UnusedUplinkPort "Uplink 1","Uplink 2","Uplink 3","Uplink 4" -ActiveUplinkPort lag1

Afterwards, I realised that it also updated the the active uplinks on the uplink port group. This change is not visible in the GUI and I’m not sure what the impact of this is but I figured that reverting it back was the best plan. So here is the command for that, if you were going to roll this out multiple times it would probably be a good idea to filter the above command based on the name of the uplink portgroup to avoid this change.

Get-VDSwitch vDS-SwitchName |Get-VDPortgroup vDS-SwitchName-DVUplinks |Get-VDUplinkTeamingPolicy |Set-VDUplinkTeamingPolicy -UnusedUplinkPort "Uplink 1","Uplink 2","Uplink 3","Uplin
k 4",lag1

Clear HA alarm on all VMs

Recently I ran into an issue where HA triggered on a cluster but failed. This generated an alert on several hundred VMs. Hating to click each one to reset the alarm that wasn’t clearing I found the following solution.

  1. PowerCLI to vCenter
  2. Run the following command to disable the alarm
  3. Get-AlarmDefinition "vSphere HA virtual machine failover failed" |Set-AlarmDefinition -Enabled:$false
  4. The alarm should clear almost instantly for all VMs
  5. Re-enable the alarm
  6. Get-AlarmDefinition "vSphere HA virtual machine failover failed" |Set-AlarmDefinition -Enabled:$true

Bi-Directional Packet Capture on ESXi

I recently ran into an issue where we needed to capture some packets from the vmk interface on a Nutanix/vSphere host. I found this great utility for that, pktcap-uw, however it only captures traffic in one direction by default. Thankfully I found someone with the info on how to run both incoming and outgoing captures at the same time.

  1. SSH to the host
  2. Update the cmd below to reflect your vmk port or whatever you are trying to capture
  3. Run this cmd
  4. pktcap-uw --vmk vmk0 --dir 0 -o /tmp/vmk0_in.pcap & pktcap-uw --vmk vmk0 --dir 1 -o /tmp/vmk0_out.pcap &
  5. Shut down the capture after your done with this cmd
  6. kill $(lsof |grep pktcap-uw |awk '{print $1}'| sort -u)
  7. Use WinSCP to connect to the host
  8. Copy vmk0_in.pcap & vmk0_out.pcap files from /tmp/*
  9. Save them somewhere useful
  10. Open in wireshark
  11. Click File > Merge > pick the 2nd file
  12. And you should be presented with a capture with both incoming and outgoing packets.

Using the pktcap-uw tool in ESXi 5.5 and later (2051814)

@beandrew – his reply is what got this working for me

Fix: User running the upgrade does not have ‘Replace a process level token’ privilege.

While migrating Windows vCenter Server 5.5 to VCSA 6.5u2c this error was observed and corrected using the following steps.

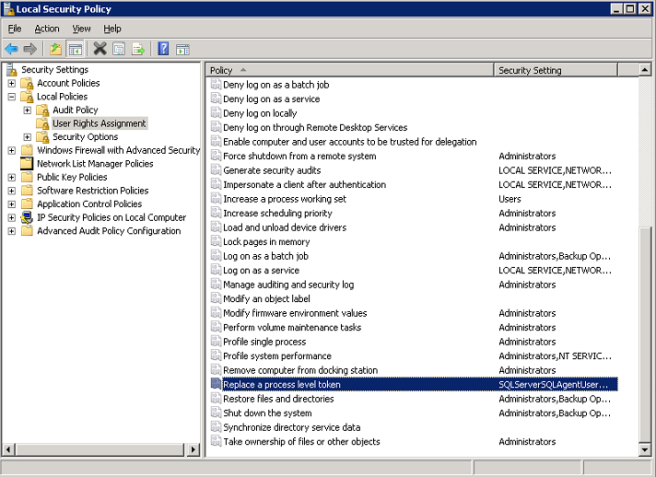
  1. Open Administrative Tools > Local Security Policy
  2. Navigate in the tree to Local Polices > User Rights Assignment0014
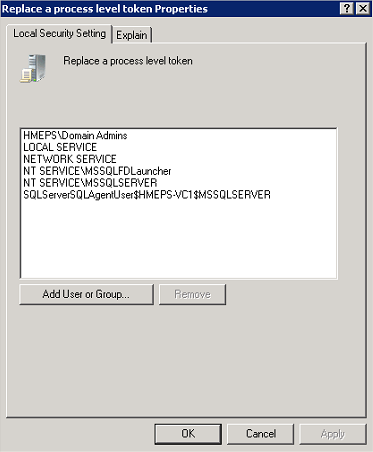
  3. Open the ‘Replace a process level token’ policy
  4. Add the migration user, in this case I added ‘Domain Admins’0015
  5. Click OK, there is no need to restart the server before re-attempting the migration

Related KB: https://kb.vmware.com/s/article/2148010